How To Activate Dito Sim- Quick & Easy Steps
Some people face problems when activating their DITO SIM. They may not get the OTP, have trouble with ID verification, or not know the steps to follow. But don’t worry! Following our simple steps, you can activate your DITO SIM without any issues.
To activate, put the DITO SIM in your phone, open the DITO App, enter your DITO number, and complete the SIM registration by adding your ID details. After you finish, you will get a confirmation message, and your DITO SIM will be ready for calls, texts, and data.
Detailed process is given below.
How to activate Dito sim
You can activate the dito sim Via this method
- DITO App
- SMS Link
- Web Portal
1: Activate DITO SIM Online via DITO App
Step: 1 Insert the DITO SIM
- Place the DITO SIM into your phone.
- Turn on your phone.
Step: 2 Download the DITO App
- Open the Google Play Store (for Android) or Apple App Store (for iPhone).
- Search for “DITO App” and tap Install.
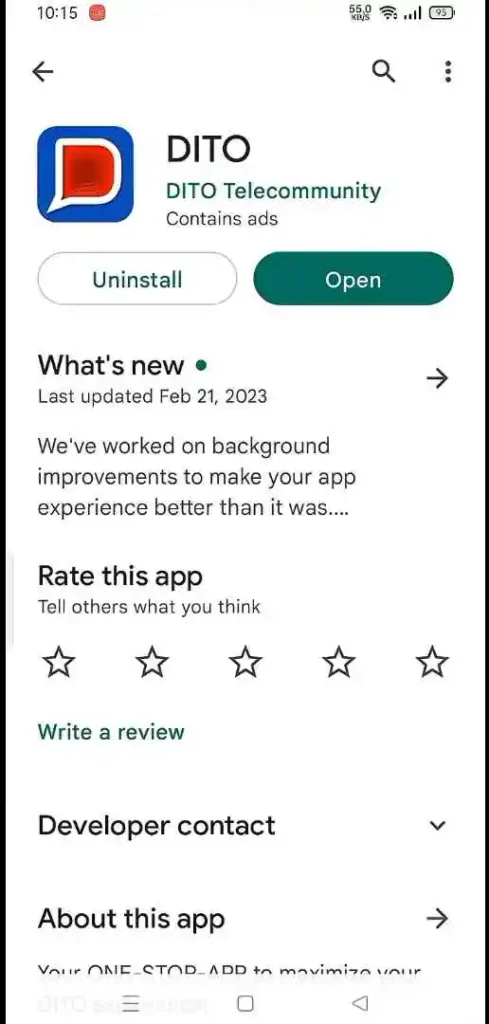
Step: 3 Open the DITO App
- Tap the DITO App icon on your phone.
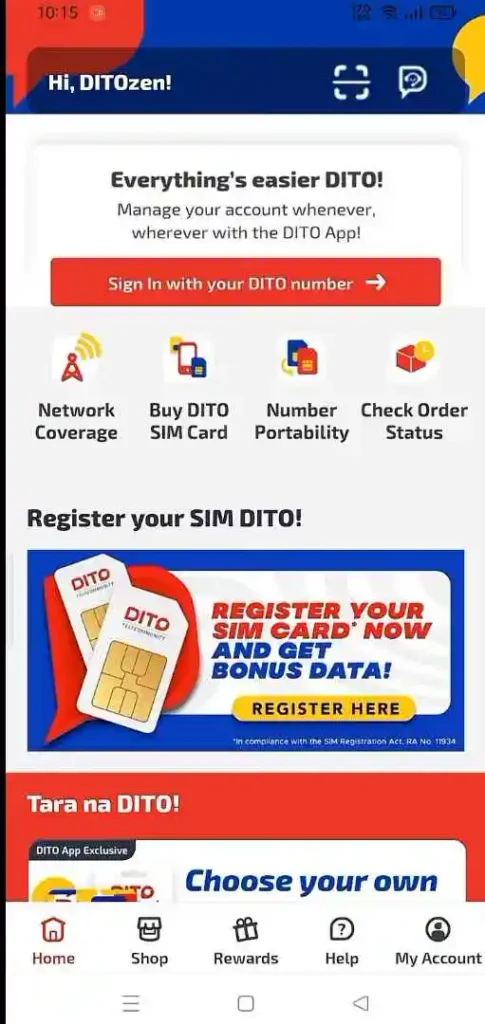
Step: 4 Enter the DITO Mobile Number
- Type your DITO mobile number in the box.
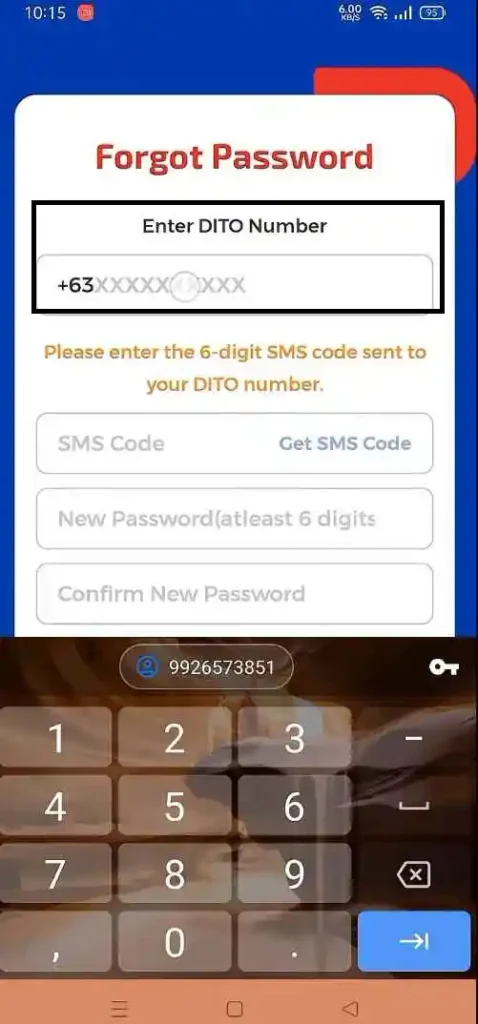
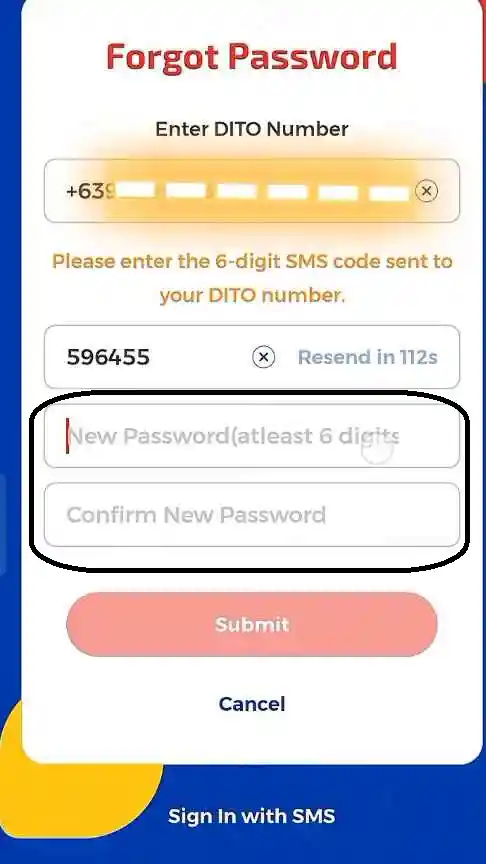
Step: 5 Set a Password
- Create a 6-digit password for your DITO account.
- Remember this password for future logins.
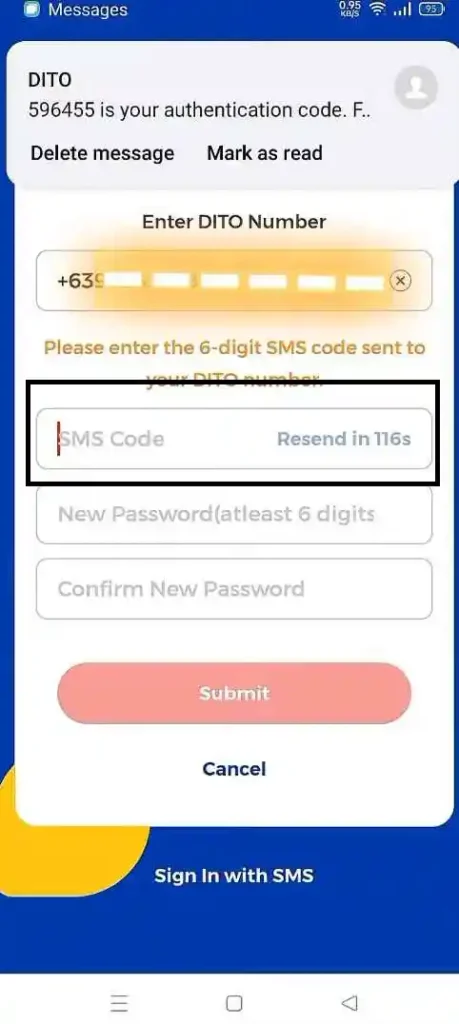
Step: 6 Verify Your Mobile Number
- You will receive an OTP (One-Time Password).
- Type the OTP code sent to your phone.
Step: 7 Complete SIM Registration
- Enter your name, birthday, and ID details.
- Upload a photo of your valid ID.
- Tap Submit to send your information.
Step: 8 Wait for a confirmation message.
Once you get the confirmation message, your DITO SIM is active. You can now use it for calls, texts, and mobile data.
2: Activate DITO SIM via SMS Link
Step: 1 Insert the DITO SIM
- Place the DITO SIM into your phone.
- Turn on the phone.
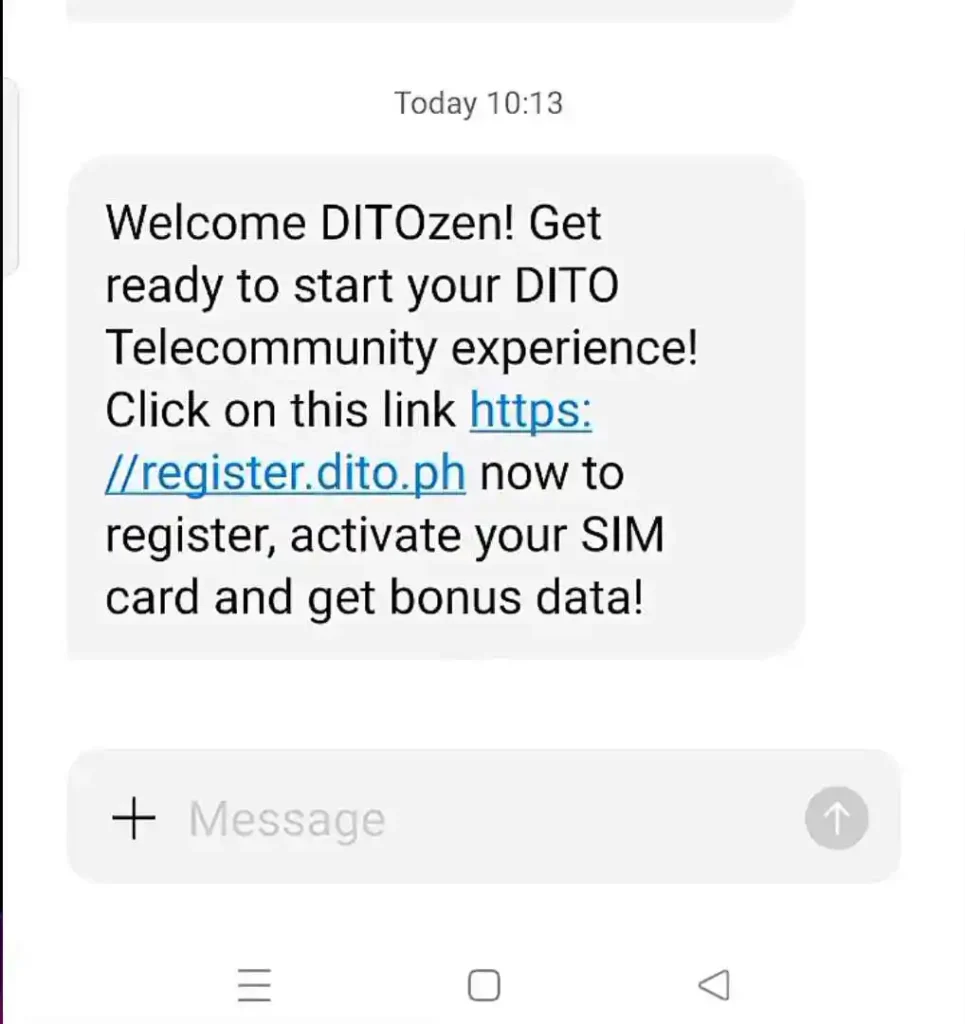
Step: 2 Receive SMS Link
- Check for a message from DITO.
- The message will have a registration link.
Step: 3 Open the Registration Link
- Tap on the link in the SMS.
- It will open the registration form in your phone’s browser.
Step: 4 Enter Your Information
- Fill in your name, birthday, and address.
- Enter your ID details as required.
Step: 5 Upload ID and Photo
- Upload a clear photo of your valid ID.
- Upload a selfie for verification.
Step: 6 Submit the Form
- Tap Submit after filling in all details.
Step: 7 Wait for Confirmation
- Wait for a confirmation message from DITO.
- Your DITO SIM will be activated after approval.
These steps will help you activate your DITO SIM using an SMS link. This method is simple and only requires your phone, internet, and a valid ID.
3: Activate DITO SIM via Web Portal
Step: 1 Insert the DITO SIM
- Place the DITO SIM into your phone.
- Turn on the phone.
Step: 2 Go to the DITO Web Portal
- Open a web browser on your phone or computer.
- Visit register.dito.ph.
Step: 3 Enter Your DITO Mobile Number
- Type your DITO mobile number in the space provided.
Step: 4 Get and Enter OTP
- DITO will send a One-Time Password (OTP) to your mobile number.
- Enter the OTP code in the portal.
Step: 5 Fill Out the Registration Form
- Enter your full name, date of birth, and address.
- Provide your ID details as required.
Step: 6 Upload ID and Selfie
- Take a photo of your ID and upload it.
- Upload a selfie for verification.
Step: 7 Submit the Form
- Review the information for errors.
- Tap Submit to complete the registration.
Step: 8 Wait for Confirmation
- Wait for a confirmation message from DITO.
- Your DITO SIM will be activated once you receive the message.
These steps will help you activate your DITO SIM through the DITO web portal. This method is fast and requires your phone, internet, and a valid ID.
Possible Issues and Solutions When Activating DITO SIM
By being aware of these possible issues and solutions, you can avoid delays when activating your DITO SIM. If problems persist, contact DITO support for further assistance.
1. OTP (One-Time Password) Not Received
Issue: You did not receive the OTP (One-Time Password) required to verify your DITO number.
Possible Reasons:
- Weak network signal.
- DITO SIM is not properly inserted.
- Incorrect mobile number entered.
Solution:
- Restart your phone and check for messages again.
- Ensure your DITO SIM is properly inserted and your phone is detecting the signal.
- Check if you entered the correct DITO number.
- Request the OTP again using the “Resend OTP” option.
- If the issue continues, contact DITO support for help.
2. Invalid or Expired OTP
Issue: The OTP you entered is incorrect or expired.
Possible Reasons:
- Delay in entering the OTP.
- Typing error in the OTP.
Solution:
- Tap “Resend OTP” to get a new code.
- Make sure to enter the OTP as soon as you receive it.
- Double-check the OTP before submitting it.
3. App Crashes or Freezes
Issue: The DITO app crashes, freezes, or stops working during the registration.
Possible Reasons:
- Outdated DITO app version.
- Insufficient phone storage or RAM.
- Unstable internet connection.
Solution:
- Update the DITO app from the Play Store or App Store.
- Clear app cache and storage in your phone settings.
- Close other running apps to free up memory.
- If it still crashes, uninstall and reinstall the DITO app.
4. SIM Not Detected
Issue: The phone does not detect the DITO SIM card.
Possible Reasons:
- The SIM was not properly inserted.
- Your phone is not VoLTE-compatible (DITO requires VoLTE).
- Faulty or damaged SIM card.
Solution:
- Remove the DITO SIM and reinsert it properly.
- Restart your phone to refresh the connection.
- Check if your phone is VoLTE-enabled.
- Test the DITO SIM on another phone.
- If the SIM is still not detected, contact DITO support to request a SIM replacement.
5. Unable to Upload ID or Selfie
Issue: The photo upload for ID or selfie fails or takes too long.
Possible Reasons:
- Weak internet connection.
- Large file size of the photo.
- Unclear or blurry photo.
Solution:
- Use a Wi-Fi connection for a stable internet speed.
- Ensure the photo size is below the required limit (usually less than 5MB).
- Make sure the photo is clear and not blurry.
- Avoid reflective surfaces when taking a picture of your ID.
- If the photo fails to upload, refresh the page and try again.
6. Error During ID Verification
Issue: The system does not accept your ID for verification.
Possible Reasons:
- Unclear or blurry ID photo.
- Unsupported type of ID.
- Name mismatch (name on ID does not match the entered name).
Solution:
- Take a clear, well-lit photo of your ID.
- Ensure that the details on your ID are readable.
- Use a valid government-issued ID like a passport, driver’s license, or national ID.
- Double-check that the name on your ID matches the name you entered.
- If the issue continues, contact DITO support for help.
7. Phone Not Compatible with DITO
Issue: Your phone is not working with the DITO SIM after activation.
Possible Reasons:
- The phone does not support VoLTE (Voice over LTE).
- The phone is locked to another network.
Solution:
- Check if your phone is on the DITO-supported devices list.
- Check if your phone supports VoLTE.
- If your phone is network-locked, contact the original provider to unlock it.
- If the phone is incompatible, use a phone that is VoLTE-compatible.
8. Registration Form Not Submitting
Issue: The form needs to be submitted after entering all the details.
Possible Reasons:
- Incomplete fields or missing required information.
- Slow or weak internet connection.
- Browser or app error.
Solution:
- Check for missing fields and fill them in.
- Ensure you have an active, stable internet connection.
- Clear the cache of your browser or app.
- Close and reopen the web portal or DITO app.
- If the issue persists, restart your device and try again.
9. No Confirmation Message After Submission
Issue: You did not receive any confirmation after submitting the form.
Possible Reasons:
- System delay in processing the request.
- Incorrect mobile number entered.
Solution:
- Wait for a few minutes, as there may be a delay in the confirmation.
- Check your email inbox or SMS for any messages from DITO.
- If no message is received, check the DITO app or web portal to see if the registration is complete.
- If not, contact DITO customer support.
10. Cannot Access the DITO Web Portal
Issue: You cannot access the DITO Web Portal for activation.
Possible Reasons:
- Server downtime or maintenance.
- Unstable internet connection.
- Browser compatibility issue.
Solution:
- Check if the DITO website is down.
- Use another web browser (like Chrome or Safari).
- Clear your browser cache.
- Restart your device or internet connection.
- If you still cannot access it, contact DITO support for an update.
11. Forgot Login Password
Issue: You forgot your password for the DITO App or web portal.
Solution:
- Tap “Forgot Password” on the login page.
- Enter your DITO number and follow the steps to reset your password.
- You will receive an OTP to reset the password.
12. Delay in SIM Activation
Issue: After submitting your form, your DITO SIM is not activated.
Possible Reasons:
- Verification delay from DITO’s system.
- Errors with ID verification or mismatched information.
Solution:
- Wait for a few hours as it may take time for DITO to process your registration.
- If it takes too long, contact DITO customer support to check your registration status.
13. Slow Internet or No Data Access
Issue: After activation, you cannot use mobile data.
Possible Reasons:
- Data is not enabled in phone settings.
- DITO APN (Access Point Name) is not configured.
Solution:
- Turn on mobile data in your phone settings.
- If the internet still doesn’t work, configure the DITO APN.
- Go to Settings > Mobile Networks > Access Point Names (APN).
- Create a new APN with the following details:
- Name: DITO
- APN: internet. dito.ph
- Save the settings and enable it.
14. SIM Registration Error
Issue: Error during SIM registration on the DITO app, web portal, or SMS link.
Possible Reasons:
- Network issues or poor connection.
- Incorrect information in the form.
Solution:
- Check your internet connection and ensure it’s stable.
- Double-check all the details you provided.
- Refresh the page and submit the form again.
- Contact DITO support if the issue continues.
15. Customer Support Not Responding
Issue: DITO support takes too long to respond to your issue.
Solution:
- Use the DITO app live chat for quicker support.
- Call the DITO customer service hotline.
- Check the DITO website’s help page for common solutions.
Extra Tips for Activating Your DITO SIM
These extra tips will help you activate your DITO SIM smoothly and avoid issues. If you follow these, your activation will be faster and stress-free.
1: Use a Strong Internet Connection
- Ensure you have a stable internet connection when using the DITO app or web portal.
- Avoid using slow mobile data or weak Wi-Fi signals.
2: Prepare Your Valid ID in Advance
- Make sure you have a clear, valid government-issued ID ready for upload.
- Supported IDs include a Driver’s License, Passport, National ID, or SSS ID.
3: Take a Clear Selfie
- Ensure your face is visible in the selfie.
- Avoid wearing hats, sunglasses, or anything that blocks your face.
- Take the photo in a well-lit area.
4: Double-Check Your DITO Number
- Before submitting your form, verify your mobile number.
- Entering the wrong number can result in failed activation.
5: Keep Your Phone Compatible
- Make sure your phone supports VoLTE.
- Without VoLTE, your DITO SIM will not work for calls and texts.
6: Use the DITO App for Faster Activation
- The DITO App is the fastest and most convenient way to activate your SIM.
- Download the app from the Play Store (Android) or App Store (iPhone).
7: Enter Information Correctly
- Be sure to enter your name, address, and ID details correctly.
- If the details on your ID do not match the information you submit, your registration may fail.
8: Take Your Time to Review
- Review all your details before tapping Submit.
- Check for errors in your name, number, and ID upload.
9: Keep a Copy of Your Registration Confirmation
- Take a screenshot of the confirmation message once your SIM is activated.
- This can be useful if you face any issues later.
10: Check for App Updates
- Ensure you have the latest version of the DITO App.
- Updated apps have fewer errors and better performance.
11: Check DITO SIM Compatibility
- Before starting, check if your phone is DITO compatible.
- Your phone must support VoLTE to access calls and texts.
12: Turn on Mobile Data for Verification
- If you’re not connected to Wi-Fi, turn on mobile data to ensure you receive the OTP (One-Time Password).
13: Use Secure Devices
- Use a trusted phone or computer to access the web portal or DITO app.
- Avoid using public devices where personal information may be exposed.
14: Know Your Registration Deadline
- The Philippines SIM Registration Law requires all SIMs to be registered.
- Ensure you activate and register your SIM before the deadline to avoid disconnection.
15: Contact DITO Support if Issues Arise
- If any step fails, contact DITO customer support through the app or website.
- Save the DITO support contact details in case you need them.
16: Restart Your Phone After Activation
- After activation, restart your phone to refresh network settings.
- This ensures that calls, texts, and data services work properly.
17: Use Strong Lighting for Photo Uploads
- When taking a picture of your ID or selfie, use natural light to avoid glare or shadows.
18: Complete Registration on Time
- Don’t delay the SIM registration to avoid disconnection.
- Register your SIM as soon as you receive it.
19: Avoid Using Public Wi-Fi
- Use a private, secure Wi-Fi network when accessing the DITO App or web portal.
- Public Wi-Fi may expose your personal information to security risks.
20: Note Your Login Credentials
- Write down your DITO login password or use a password manager to avoid being locked out.
Final Thoughts
Activating a DITO SIM can be done using different methods. Some users face issues like OTP delays or ID upload problems, but these can be solved by following the correct steps. The most common method is the DITO App.
To activate, insert the DITO SIM into your phone, open the DITO App, enter your DITO number, and complete the registration process by adding your ID details and selfie photo. You can also activate using the Web Portal or the SMS Link sent to your phone. Each method is simple and ensures your DITO SIM is ready to use for calls, texts, and mobile data.
Frequently Asked Questions
How do I activate my DITO SIM using the DITO App?
Answer: Insert the DITO SIM into your phone, download and open the DITO App, enter your DITO number, and complete the registration. You will need to provide your name, and ID details, and upload a photo of your ID and a selfie. Once submitted, you will receive a confirmation message when the SIM is activated.
Can I activate my DITO SIM without the DITO App?
Answer: Yes, you can activate your DITO SIM using the Web Portal or the SMS Link sent to your phone. Visit the register. Dito. Ph, enter your DITO number, provide your personal information, and upload a photo of your ID and selfie.
What ID is required to activate my DITO SIM?
Answer: You need a valid government-issued ID like a Passport, Driver’s License, SSS ID, or Philippine National ID. The ID must be clear, and you also need to upload a selfie photo.
What should I do if I don’t receive the OTP?
Answer: Check your network signal and make sure your DITO SIM is properly inserted. Tap the Resend OTP option to get a new code. If it still doesn’t work, restart your phone and check your messages.
Can I activate my DITO SIM using a computer?
Answer: Yes, you can activate it through the DITO Web Portal. Go to register.dito.ph on your computer, enter your DITO number, and complete the registration process online.
How long does it take to activate a DITO SIM?
Answer: The activation process usually takes a few minutes. After submitting your information and ID, you will receive a confirmation message. If there is a delay, it may take a little longer for DITO to verify your information.
What should I do if my SIM activation is delayed?
Answer: If activation takes too long, check if you received a confirmation message. If not, contact DITO customer support. They can check the status of your registration.
How do I activate my DITO SIM using an SMS link?
Answer: Insert your DITO SIM and turn on your phone. DITO will send an SMS link to your phone. Tap the link, fill out the registration form, provide your ID details, upload a photo of your ID and selfie, and tap Submit. Once approved, you will get a confirmation message.
How do I check if my DITO SIM is activated?
Answer: You will receive a confirmation message from DITO after activation. You can also check if you can make calls, or texts, or use mobile data. If these services work, your DITO SIM is activated.
Do I need to register my DITO SIM to activate it?
Answer: Yes, you must register your DITO SIM to activate it. This is required under the Philippines SIM Registration Law. Without registration, the SIM will not be activated.
Why Do You Need to Activate Your DITO SIM?
Answer: You need to activate your DITO SIM to access calls, texts, and mobile data, comply with the Philippines SIM Registration Law, and ensure security and user identity verification.
How to Activate DITO SIM on iPhone
Answer: To activate a DITO SIM on an iPhone, insert the DITO SIM into the phone and turn it on. Download and open the DITO App from the Apple App Store. Enter your DITO number and complete the SIM registration by providing your ID details and uploading a photo of your ID and selfie. Submit the form and wait for a confirmation message. Once activated, go to Settings > Mobile Data > Mobile Data Options and enable 4G and VoLTE. If needed, restart your iPhone to complete the process.

